What Is a Hot Water Power Washer and Why Does It Matter?
A hot water power washer is a high-pressure cleaning machine that heats water — typically between 140°F and 330°F (60°C–165°C) — before forcing it through a nozzle at high velocity to strip away dirt, grease, oil, mold, and other tough contaminants from surfaces. Unlike cold water pressure washers, which rely purely on mechanical force, hot water units combine thermal energy with pressure to break down stubborn residues at a molecular level. This makes them significantly more effective for industrial, commercial, and heavy-duty residential cleaning tasks.
The science behind a hot water power washer is straightforward but powerful. Heat reduces the surface tension of water, allowing it to penetrate grime more deeply. When combined with detergent — which is far more effective in warm water — the result is a cleaning performance that can be six times more effective than cold water cleaning alone. According to industry studies, hot water dissolves grease, oil, and fats in a fraction of the time it would take cold water, which is why restaurants, auto shops, farms, and construction companies rely on them heavily.
For homeowners and business owners alike, understanding the difference between a hot water power washer and its cold water counterpart is the first step toward making a smart investment. The wrong machine means wasted time, wasted money, and surfaces that never quite get clean. The right machine means effortless cleaning, reduced chemical usage, and long-lasting equipment that pays for itself in months.
How Does a Hot Water Power Washer Work?
Understanding the internal mechanics of a hot water power washer helps you make a better purchasing decision and maintain your equipment properly. Here’s how the machine works from start to finish:
- Water Intake — Cold water enters the machine through an inlet, usually connected to a standard garden hose or a dedicated water supply.
- Pump Pressurization — A pump — either axial cam, triplex plunger, or wobble plate — pressurizes the water to anywhere from 1,000 to 5,000+ PSI (pounds per square inch).
- Heating Coil or Burner — The pressurized water passes through a coiled heating element powered by diesel, oil, natural gas, propane, or electricity. This raises the water temperature rapidly.
- Nozzle Delivery — The heated, pressurized water exits through an interchangeable nozzle, with spray angles typically ranging from 0° (intense jet) to 65° (wide fan).
- Chemical Injection — Most hot water units include a detergent injection system that mixes cleaning agents into the water stream at a controlled ratio for enhanced cleaning power.
The combination of heat + pressure + detergent is often referred to in the cleaning industry as the “cleaning triangle.” Remove any one element and cleaning effectiveness drops dramatically. A hot water power washer maximizes all three simultaneously.
“Hot water cleaning is not just faster — it is fundamentally different. The thermal energy changes what’s possible.” — Pressure Washing Resource Association (PWRA)
Suggested read: Car Auto Wash Machine: Everything You Need to Know Before Buying or Using One
Hot Water Power Washer vs. Cold Water Pressure Washer: Key Differences
One of the most common questions buyers ask is: do I really need a hot water power washer, or will a cold water unit do the job? The answer depends entirely on what you’re cleaning. The table below breaks down the key distinctions clearly.
| Feature | Hot Water Power Washer | Cold Water Pressure Washer |
|---|---|---|
| Water Temperature | 140°F – 330°F | Ambient (40°F – 80°F) |
| Grease/Oil Removal | Excellent | Poor to Moderate |
| Cleaning Speed | Up to 6× faster | Standard |
| Chemical Use | Reduced (heat activates detergents) | Higher chemical usage |
| Equipment Cost | $1,500 – $15,000+ | $100 – $3,000 |
| Operating Cost | Higher (fuel for heating) | Lower |
| Best For | Grease, oil, food residue, mold, farms, restaurants | Concrete, decks, vehicles, general dirt |
| Weight/Portability | Heavier, often trailer-mounted | Light to medium |
| Sanitization | Yes — kills bacteria | No |
As the table illustrates, a hot water power washer is the superior choice wherever grease, oil, or biological contamination is involved. Cold water units are perfectly fine for general surface cleaning — driveways, fences, patios — but fall short when cleaning commercial kitchens, engine bays, livestock areas, or food processing equipment.
For vehicle cleaning specifically, many professional detailers and self-service car wash facilities (like blue sky car wash) use a combination of hot water pre-soaking and targeted pressure to safely lift road grime, tar, and brake dust without damaging paint or trim. Hot water softens adhesive contaminants that cold water simply can’t touch.
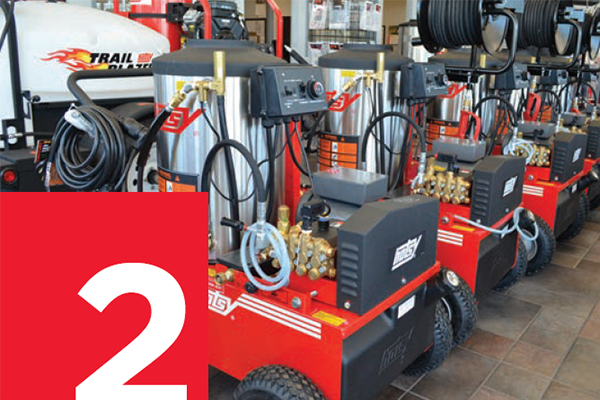
Types of Hot Water Power Washers
Not all hot water power washers are built the same. They vary by power source, pump type, mobility, and intended application. Knowing the different categories helps you match the right machine to your specific needs.
Electric Hot Water Power Washers
Electric hot water pressure washers are powered by an electric motor rather than a gas or diesel engine. They are ideal for indoor use, enclosed spaces, or anywhere ventilation is a concern. They are generally quieter, produce zero emissions at the point of use, and require less maintenance than engine-driven models.
- Voltage: Typically 120V (residential) or 240V (commercial/industrial)
- PSI Range: 1,000 – 3,000 PSI
- Best For: Food service kitchens, warehouses, garages, car detailing shops
- Heating Method: Electric heating element (diesel burner not needed)
One key advantage of electric models is their lower operating cost per hour in regions with affordable electricity. However, they are limited by cord length and power outlet availability, which can restrict use in large outdoor environments.
Gas-Powered Hot Water Power Washers
Gas-powered hot water pressure washers combine a gasoline engine with a diesel or kerosene burner to both run the pump and heat the water. These are among the most powerful portable units available and are widely used by professional cleaning contractors.
- PSI Range: 2,000 – 4,000+ PSI
- GPM (Gallons Per Minute): 2.5 – 5.0
- Best For: Construction sites, farms, outdoor industrial cleaning
- Portability: High — no electrical cord required
The trade-off is noise, fuel costs, and emissions. Gas models are not suitable for enclosed spaces without proper ventilation. However, for outdoor jobs where portability matters most, they are unbeatable.
Diesel-Powered Hot Water Power Washers
Diesel hot water power washers are the workhorses of the commercial and industrial cleaning world. Diesel engines are more fuel-efficient at sustained loads than gasoline engines, and diesel fuel has a higher energy density that enables longer operation between refills.
- PSI Range: 2,500 – 5,000+ PSI
- GPM: 3.0 – 8.0
- Best For: Municipalities, large farms, fleets, oil and gas, food processing plants
- Common Configuration: Skid-mounted or trailer-mounted for maximum capacity
Many municipalities use diesel trailer-mounted hot water units for graffiti removal, drain cleaning, and sidewalk sanitation. Their large fuel tanks and water tanks enable hours of uninterrupted operation.
Trailer-Mounted Hot Water Power Washers
For the highest-capacity applications, trailer-mounted hot water pressure washers deliver unmatched performance. These systems include large diesel engines, high-capacity pumps (up to 10+ GPM), 100+ gallon water tanks, hose reels, chemical injection systems, and recovery systems all mounted on a highway-towable trailer.
- PSI Range: 3,000 – 5,000 PSI
- Water Tank: 100 – 500 gallons
- Best For: Contract cleaning businesses, industrial facilities, fleet washing operations
- Cost: $8,000 – $50,000+
These units represent a serious investment but are capable of generating significant revenue in a professional cleaning business. A single trailer-mounted hot water system can handle an entire commercial fleet wash in a single day.
Top Features to Look for in a Hot Water Power Washer
Buying a hot water power washer is a significant investment. Here are the critical features you should evaluate before making a purchase decision:
1. PSI and GPM Ratings
PSI (pressure) determines how forcefully water hits the surface. GPM (flow rate) determines how much water you use per minute. Together, they produce Cleaning Units (CU), calculated as PSI × GPM. A machine with 3,000 PSI and 4 GPM produces 12,000 Cleaning Units — significantly more effective than a 3,000 PSI / 2 GPM machine at 6,000 CU.
Suggested read: Wall Mounted Pressure Washer: Everything You Need to Know Before Buying
| Application | Recommended PSI | Recommended GPM |
|---|---|---|
| Light residential | 1,000 – 1,500 | 1.5 – 2.0 |
| Deck/driveway cleaning | 1,500 – 2,500 | 2.0 – 3.0 |
| Commercial vehicle washing | 2,000 – 3,000 | 3.0 – 4.0 |
| Industrial grease removal | 3,000 – 4,000 | 4.0 – 6.0 |
| Heavy industrial/municipal | 4,000 – 5,000+ | 5.0 – 10.0 |
2. Maximum Water Temperature
Higher temperature capability translates directly to better grease and bacteria removal. Look for a unit that reaches at least 180°F–200°F for commercial use. Steam-capable units that reach 300°F+ are ideal for sanitizing food contact surfaces and killing mold spores on contact.
3. Burner Type and Fuel Source
The heating element is the heart of a hot water washer. Coil burners are most common — water spirals through a heated coil, gaining temperature quickly. Look for:
- Adjustable thermostat for precise temperature control
- Automatic burner shutoff to prevent overheating
- Stainless steel coils for corrosion resistance and longevity
- Energy efficiency ratings to keep operating costs low
4. Pump Type and Durability
The pump is the most expensive component to repair or replace. Triplex plunger pumps are the gold standard for commercial hot water units — they run cooler, last longer, and handle higher pressures than axial cam or wobble plate pumps. Always look for pumps with brass heads and ceramic plungers for maximum longevity.
5. Hose Length and Material
Standard hoses on hot water pressure washers range from 25 to 100 feet. For hot water applications, always use hoses rated for high-temperature use (typically marked “hot water rated”). Standard cold water hoses will degrade rapidly when exposed to heated water and may burst or kink unexpectedly.
6. Chemical Injection System
The best hot water power washers include a downstream or upstream chemical injector that mixes detergent into the water at a controlled ratio. Upstream injection (before the pump) works better for abrasive cleaners, while downstream injection (after the pump) is gentler on pump seals. Look for adjustable dilution ratios for flexibility across different cleaning tasks.
Best Uses for a Hot Water Power Washer
The versatility of a hot water power washer is one of its greatest strengths. Here are the most impactful applications across industries:
Commercial Kitchen and Restaurant Cleaning
Grease buildup in commercial kitchens is one of the most challenging and dangerous cleaning problems in any facility. Hot water pressure washing is the most effective method for removing baked-on grease from cooking equipment, exhaust hoods, floors, and walls. Health inspectors look closely at grease accumulation — a thorough monthly hot water wash helps businesses pass inspections with confidence.
Key stats:
- The FDA Food Code requires commercial kitchen surfaces to be “cleaned at a frequency necessary to prevent the accumulation of soil residues”
- Grease fires account for 29% of all restaurant fires in the U.S. (National Fire Protection Association, 2023)
- Hot water at 180°F+ can reduce surface bacteria counts by up to 99.9% when combined with appropriate detergents
Automotive and Fleet Washing
From car dealerships to trucking companies, fleet washing with a hot water power washer is faster, more thorough, and more professional than cold water alternatives. Hot water dissolves road salt, diesel soot, hydraulic fluid, and brake dust — contaminants that cause long-term corrosion and paint damage if left untreated.
Professional detailers often use hot water pre-rinses to soften tar spots and adhesive residue before applying clay bars or chemical decontaminants. For self-service car wash facilities, understanding how hot water integrates into a full cleaning protocol is invaluable. Facilities like blue sky car wash demonstrate how professional-grade equipment transforms the customer experience compared to basic cold water bays.
Agricultural and Livestock Cleaning
Farms present some of the most demanding cleaning environments imaginable — heavy organic matter, mud, manure, and biological contamination across large surface areas. Agricultural hot water pressure washers are essential for:
- Cleaning milking parlors and dairy equipment (FDA compliance requirements)
- Sanitizing poultry houses between flocks (biosecurity protocols)
- Washing tractors, combines, and implements to prevent rust and cross-contamination
- Pressure washing hog barns and livestock trailers
The heat component is critical in agricultural settings because it kills pathogens like E. coli, Salmonella, and Listeria that cold water simply moves around rather than eliminates.
Construction and Concrete Cleaning
Construction sites accumulate concrete splatter, mortar, paint, rust stains, and oil from heavy equipment on a daily basis. A hot water power washer tackles all of these effectively:
- Fresh concrete splatter — washes off easily with hot water before curing
- Cured concrete and mortar — requires a combination of hot water + acid-based detergents
- Oil and grease from equipment — emulsified and removed by hot water thermal action
- Rust stains on concrete — treated with oxalic acid solutions applied via hot water injection
Municipal and Government Applications
Cities and municipalities use hot water pressure washers extensively for:
Suggested read: Coin Operated Washer and Dryer: Everything You Need to Know Before You Buy or Use One
- Graffiti removal from public buildings and infrastructure
- Sidewalk and plaza sanitation in high-foot-traffic areas
- Drain and sewer maintenance (hot water jetting to dissolve grease blockages)
- Vehicle maintenance bays for police, fire, and public works fleets
Case Study: How a Cleaning Company Doubled Revenue With a Hot Water Power Washer
Background: A small exterior cleaning company in the Pacific Northwest had been operating with two cold water pressure washers for three years, focusing primarily on residential deck and driveway cleaning. Revenue had plateaued at approximately $8,000/month.
The Investment: The owner invested $6,500 in a diesel-powered hot water pressure washer with a 3,500 PSI, 4.0 GPM output and a 200°F maximum temperature.
New Services Added:
- Commercial kitchen deep cleaning — $400–$800 per visit
- Restaurant exhaust hood cleaning — $300–$600 per service
- Fleet washing contracts — $500–$2,000/month per client
- Agricultural equipment cleaning — $250–$500 per session
Results After 12 Months:
- Revenue increased from $8,000/month to $18,500/month — a 131% increase
- The machine paid for itself in under 4 months
- Customer retention in new commercial segment: 87%
“The hot water unit opened up markets I couldn’t even touch before. Restaurants won’t hire you if you can’t remove grease. It was the best business decision I ever made.” — Owner, Pacific Northwest Cleaning Co.
Hot Water Power Washer Safety: What You Must Know
Operating a hot water power washer involves real hazards that require proper training, protective equipment, and situational awareness. The combination of high pressure and extreme temperatures creates risks that cold water washers simply don’t present.
Personal Protective Equipment (PPE) Requirements
Always wear the following when operating a hot water pressure washer:
- Safety goggles or face shield — Deflected water at 3,000 PSI can cause serious eye injury
- Waterproof gloves — Protects hands from hot water burns and chemical exposure
- Closed-toe waterproof boots — Steel-toe recommended for heavy equipment operation
- Hearing protection — Gas and diesel-powered units typically operate above 85 dB
- Waterproof apron or rain suit — Prevents burns from steam and hot water splash
High-Pressure Injection Injuries
One of the most serious — and underreported — hazards of pressure washing is high-pressure injection injury. If a high-pressure water stream contacts skin at close range, water can be injected beneath the skin surface, causing severe tissue damage that is not immediately apparent. These injuries require immediate emergency medical treatment and are often misdiagnosed as minor cuts.
- Never point a pressure washer wand at yourself or others
- Never place your hand in front of the nozzle to “test” the pressure
- Always engage the safety lock when not actively washing
Hot Water Burn Risks
Water at 180°F+ causes third-degree burns within one second of contact. Always allow the machine to cool before performing maintenance. Check hose connections and fittings for leaks before starting, and never use a machine with damaged hoses.
Surface Damage Prevention
Hot water + high pressure can damage surfaces not designed for it:
- Wood decks: Use wide-angle nozzles (40°–65°) and keep the wand moving — dwelling in one spot causes splintering
- Painted surfaces: Test a small area first; heat can soften paint and cause peeling
- Windows and glass: Use a low-pressure fan spray only; direct pressure can crack glass
- Asphalt: Avoid temperatures above 160°F — heat softens asphalt binders
How to Choose the Right Hot Water Power Washer for Your Needs
Choosing the correct hot water power washer requires matching the machine’s capabilities to your specific cleaning demands. Here’s a practical decision framework:
Step 1: Define Your Cleaning Tasks
List every surface and type of contamination you need to clean. Be specific:
- Are you cleaning oil and grease (requires hot water)?
- Are you cleaning large outdoor surfaces (requires high GPM)?
- Are you sanitizing food contact surfaces (requires 180°F+)?
- Are you working indoors (requires electric model)?
Step 2: Calculate Required Cleaning Units
Use the formula: Cleaning Units = PSI × GPM
- Light residential tasks: Aim for 3,000–6,000 CU
- Commercial cleaning: Aim for 8,000–15,000 CU
- Heavy industrial: Aim for 15,000–25,000+ CU
Step 3: Choose Your Power Source
| Scenario | Recommended Power Source |
|---|---|
| Indoor use / food service | Electric |
| Outdoor portable work | Gas |
| Heavy-duty sustained use | Diesel |
| Maximum capacity, stationary | Natural gas or diesel |
Step 4: Set a Realistic Budget
| Budget Range | What You Can Expect |
|---|---|
| $1,500 – $3,000 | Entry-level commercial electric, basic gas models |
| $3,000 – $6,000 | Mid-range gas or diesel, triplex pump, 3,000+ PSI |
| $6,000 – $15,000 | Professional diesel, high GPM, stainless components |
| $15,000+ | Industrial trailer-mounted, full commercial grade |
Step 5: Evaluate Brand and Warranty
Top manufacturers in the hot water pressure washer market include Landa, Hotsy, Pressure-Pro, Mi-T-M, Alkota, and Hydro Tek. Look for:
Suggested read: Can You Put Shoes in the Washer? Everything You Need to Know Before You Try
- Minimum 2-year pump warranty
- 1-year burner warranty
- Availability of local service dealers
- Replacement parts availability
Maintenance Tips for Your Hot Water Power Washer
Proper maintenance extends the life of your hot water pressure washer significantly. A well-maintained machine can last 10–20 years in commercial service. Here is what regular maintenance looks like:
Daily Maintenance Checklist
- ✅ Check fuel levels (diesel/gas models)
- ✅ Inspect hoses and connections for leaks
- ✅ Check oil level in pump and engine
- ✅ Run fresh water through the system after chemical use
- ✅ Inspect nozzles for wear or clogging
Monthly Maintenance Checklist
- ✅ Descale the heating coil with a descaling solution (prevents mineral buildup)
- ✅ Replace or inspect pump oil
- ✅ Check and clean the burner nozzle
- ✅ Inspect chemical injector for blockages
- ✅ Test thermostat accuracy with a surface thermometer
Seasonal Maintenance
- Before winter storage: Flush antifreeze solution through the system to prevent freeze damage to coils, pump, and valves
- Spring startup: Replace pump oil, inspect all o-rings and seals, clean fuel filters
Pro Tip: Mineral scale buildup in the heating coil is the #1 cause of hot water washer failures. If your water source is hard water (above 7 grains per gallon), install a water softener or use descaling solution monthly to protect your investment.
Environmental Considerations When Using a Hot Water Power Washer
Responsible use of a hot water power washer includes understanding its environmental footprint and taking steps to minimize negative impacts.
Wastewater Runoff
Hot water pressure washing — especially when used with degreasers — generates wastewater contaminated with:
- Petroleum products (oils and greases)
- Detergents and surfactants
- Bacteria and biological material (in agricultural applications)
- Heavy metals (in industrial applications)
In most U.S. jurisdictions, allowing contaminated wash water to enter storm drains is a violation of the Clean Water Act. Best practices include:
- Using containment berms to capture runoff
- Employing a wastewater recovery/recycling system
- Disposing of captured wastewater at an approved facility or through a licensed hauler
- Using biodegradable, phosphate-free detergents where possible
Fuel Efficiency and Emissions
Diesel and gas-powered hot water pressure washers produce exhaust emissions. To minimize environmental impact:
- Choose units with Tier 4 Final diesel engines, which reduce particulate matter and NOx emissions by over 90% compared to older engines
- Maintain burners properly — a properly tuned burner burns more completely and wastes less fuel
- Right-size your equipment — running an oversized unit for small jobs wastes fuel and increases emissions unnecessarily
Hot Water Power Washer Cost Breakdown: What to Budget For
Many buyers focus only on the purchase price and underestimate total ownership costs. Here is a realistic total cost of ownership breakdown for a mid-range commercial diesel hot water pressure washer:
| Cost Category | Annual Estimate |
|---|---|
| Initial purchase (amortized over 7 years) | $1,000 – $2,000/year |
| Diesel/fuel for engine | $500 – $2,500/year |
| Heating fuel (kerosene/diesel for burner) | $800 – $3,000/year |
| Pump oil changes (2–4/year) | $50 – $150/year |
| Nozzle replacement | $30 – $100/year |
| Hose replacement/repair | $100 – $500/year |
| Descaling treatments | $50 – $200/year |
| Detergents and chemicals | $200 – $1,500/year |
| Total Annual Operating Cost | $2,730 – $9,950/year |
For a professional cleaning business generating $50,000+ in annual revenue from hot water washing services, these costs represent a very manageable 5–20% of gross revenue — well within acceptable industry margins.
Ready to Invest in a Hot Water Power Washer?
If your cleaning tasks involve grease, oil, biological contamination, or any surface that requires sanitation, a hot water power washer is not a luxury — it’s a necessity. Whether you’re a homeowner dealing with a heavily stained driveway, a restaurant owner who needs to pass health inspections, or a cleaning contractor looking to expand your service offering, the right hot water unit will transform what you’re able to accomplish.
Take the next step: Browse our selection of commercial and residential hot water power washers to find the exact machine matched to your pressure, flow rate, temperature, and budget requirements. Compare models side by side, read verified owner reviews, and take advantage of expert guidance to make your purchase with total confidence.
Frequently Asked Questions About Hot Water Power Washers
What is a hot water power washer used for?
A hot water power washer is used for removing grease, oil, food residue, mold, mildew, paint, and heavy contamination from a wide variety of surfaces. Common applications include commercial kitchens, automotive and fleet cleaning, agricultural facilities, construction sites, and municipal infrastructure maintenance. The heated water dramatically improves cleaning speed and effectiveness compared to cold water pressure washing, especially on oily or fatty contamination.
How hot does a hot water power washer get?
Most commercial hot water pressure washers heat water to between 140°F and 210°F for standard cleaning applications. Specialized industrial and steam units can reach 300°F–330°F for high-level sanitization. The ideal temperature depends on the application — grease removal is most effective between 180°F–200°F, while surface sanitization may require 200°F+.
Is a hot water power washer worth the extra cost?
For applications involving grease, oil, or biological contamination, a hot water power washer is absolutely worth the premium cost. It cleans up to six times faster than cold water, uses fewer chemicals, and achieves sanitization levels impossible with cold water. For general surface cleaning like driveways or fences, a cold water unit may be sufficient — but for professional or commercial use, the hot water advantage is decisive.
Can I use a hot water power washer on my car?
Yes, a hot water power washer can be used on vehicles, but with important precautions. Use a wide-angle nozzle (40°–65°) and keep the wand at least 12–18 inches from the surface. Avoid direct contact with window seals, rubber trim, or electrical connections. Lower-temperature settings (130°F–150°F) are recommended for automotive use to prevent paint softening. Many professional detailers use hot water rinses for pre-treating tar and road grime before hand washing.
Suggested read: Zoom Car Wash: Everything You Need to Know Before You Go
What fuel does a hot water power washer use?
Hot water power washers use separate fuel sources for the engine (which drives the pump) and the burner (which heats the water). Gas models use gasoline for the engine and diesel or kerosene for the burner. Diesel models use diesel for both. Electric models use grid electricity to drive the pump and heat the water. Propane-powered burners are also available as an alternative to diesel/kerosene in some configurations.
How often should I descale my hot water power washer?
In areas with hard water (high mineral content), descaling should be performed monthly. In areas with soft water, quarterly descaling is typically sufficient. Signs that your heating coil needs descaling include reduced water temperature at the outlet, increased fuel consumption, and longer heat-up times. A coil that is heavily scaled will eventually fail — regular descaling is one of the highest-ROI maintenance tasks you can perform on a hot water washer.
How much does it cost to run a hot water power washer per hour?
Operating costs vary by model and fuel prices. As a general estimate:
- Electric models: $0.50 – $2.00/hour (electricity only)
- Gas-powered models: $2.00 – $5.00/hour (gasoline + heating fuel)
- Diesel models: $3.00 – $8.00/hour (diesel + heating fuel)
These costs are offset by reduced chemical usage and dramatically faster cleaning speeds, which reduce total labor hours per job.
What PSI do I need in a hot water power washer?
The right PSI depends on your application. For light commercial use (vehicles, small equipment), 1,500–2,500 PSI is sufficient. For heavy commercial use (fleet washing, restaurant cleaning), 2,500–3,500 PSI is recommended. For industrial use (construction equipment, petrochemical, agriculture), 3,500–5,000+ PSI is appropriate. Always pair PSI with an adequate GPM for maximum cleaning unit output.
Citation: For technical specifications, pressure washing industry standards, and equipment comparisons referenced in this article, see Pressure Washr — Hot Water Pressure Washer Resource.