Hand washing your car is more than just a weekend chore—it’s an art form that can preserve your vehicle’s paint, extend its lifespan, and give you that showroom shine without breaking the bank. While automated car washes might seem convenient, nothing beats the thorough, gentle care that comes from a proper hand wash car wash technique. This comprehensive guide will transform you from a casual car cleaner into a detailing expert, covering everything from essential tools to professional-grade techniques that will make your neighbors wonder if you bought a new car.
Why Choose Hand Wash Car Wash Over Automated Options?
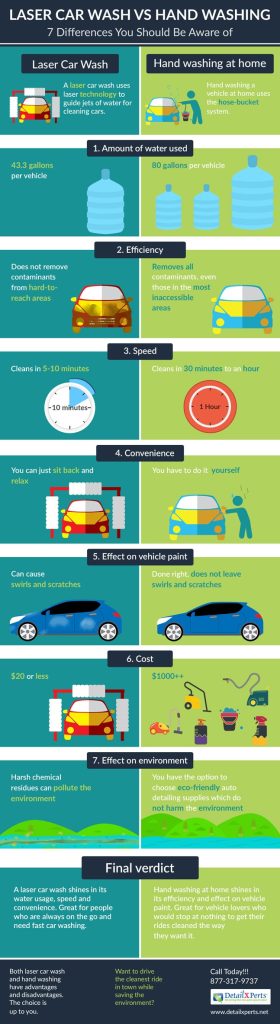
The debate between hand car wash methods and automated systems has been ongoing for decades, but the evidence clearly favors manual washing for serious car enthusiasts. Automated car washes, while convenient, use harsh brushes that can create microscopic scratches called swirl marks. These tiny imperfections accumulate over time, dulling your paint’s finish and reducing your vehicle’s resale value.
Hand washing provides superior results because it allows you to control every aspect of the cleaning process. You can adjust pressure based on different areas of your car, spend extra time on heavily soiled sections, and use techniques that protect rather than damage your paint. Professional detailers exclusively use hand washing methods for a reason—it’s simply the best way to achieve exceptional results.
Key Benefits of Hand Washing Your Car:
- Paint protection: Gentle cleaning prevents swirl marks and scratches
- Thorough cleaning: Ability to focus on problem areas and hard-to-reach spots
- Cost savings: Significantly cheaper than professional detailing services
- Quality control: You decide the level of care and attention each area receives
- Customization: Use specific products for different materials and finishes
- Therapeutic value: Many car owners find the process relaxing and rewarding
Essential Tools and Supplies for Professional Hand Wash Car Wash
Success in car hand washing starts with having the right equipment. Professional-quality tools don’t have to cost a fortune, but investing in quality supplies will dramatically improve your results and make the process more efficient.
Must-Have Washing Tools:
| Tool | Purpose | Recommended Material |
|---|---|---|
| Wash Mitts | Primary washing tool | Microfiber or natural sheepskin |
| Buckets | Hold wash and rinse water | 5-gallon capacity minimum |
| Grit Guards | Prevent dirt recirculation | Plastic insert for bucket bottom |
| Hose with Nozzle | Rinsing and initial wash | Adjustable spray pattern |
| Drying Towels | Water removal | Waffle-weave microfiber |
| Wheel Brushes | Tire and rim cleaning | Soft bristles, various sizes |
Professional-Grade Car Wash Products:
The difference between amateur and professional results often comes down to product selection. Quality car wash soap is pH-balanced to clean effectively without stripping protective waxes or sealants. Avoid household dish soap, which is designed to cut through grease and will strip your car’s protective coatings.
Premium car shampoos contain lubricating agents that allow dirt to slide off your paint rather than being ground in during washing. Look for products specifically labeled as “pH-neutral” or “paint-safe.” Popular professional brands include Chemical Guys, Meguiar’s, and Adam’s Polishes, all of which offer concentrated formulas that provide excellent value.
Suggested read: How Much Is a Car Wash? Complete 2025 Pricing Guide for Every Budget
The Complete Hand Wash Car Wash Process: Step-by-Step Guide
Mastering the proper hand car wash technique requires following a systematic approach that maximizes cleaning effectiveness while minimizing the risk of paint damage. This process, refined by professional detailers over decades, ensures consistent, exceptional results every time.
Step 1: Pre-Wash Preparation and Setup
Before touching your car with any cleaning products, proper preparation sets the foundation for success. Choose the right location—ideally a shaded area away from direct sunlight, which can cause soap to dry too quickly and leave spots. Early morning or late afternoon provides optimal conditions for hand washing cars.
Temperature considerations are crucial for effective cleaning. Your car’s surface should be cool to the touch—never wash a hot car as this can cause products to flash-dry and become difficult to remove. If you’ve been driving, wait at least 30 minutes for the surface to cool down.
Set up your two-bucket wash system, which is the cornerstone of professional car washing. Fill one bucket with clean rinse water and the other with your soap solution. Install grit guards in both buckets—these plastic inserts trap dirt at the bottom, preventing it from being picked up by your wash mitt and transferred back to your car’s paint.
Step 2: Initial Rinse and Contaminant Removal
Begin your hand wash car wash process with a thorough rinse to remove loose dirt, debris, and surface contaminants. Use a hose with adjustable spray settings, starting with a gentle shower setting to avoid forcing dirt across the paint surface. Work from top to bottom, allowing gravity to help carry contaminants away from the vehicle.
Pay special attention to wheel wells and undercarriage areas where road salt, mud, and debris accumulate. These areas often harbor the most stubborn contaminants and benefit from extended rinse time. For heavily soiled vehicles, consider using a pre-wash foam or citrus-based degreaser on lower panels and wheel wells before the main wash process.
Step 3: Wheel and Tire Cleaning
Always clean wheels first during your hand car wash routine because they’re typically the dirtiest part of your vehicle. Brake dust, road grime, and tar accumulate on wheels and can contaminate your wash water if cleaned after the paint. Use dedicated wheel cleaning products and separate tools to avoid cross-contamination.
Spray wheel cleaner on one wheel at a time, starting with the least dirty wheel (usually the rear passenger side) and working toward the dirtiest (typically the front driver’s side). Allow the cleaner to dwell for the manufacturer’s recommended time—usually 2-3 minutes—to break down bonded contaminants.
Use appropriate brushes for different wheel materials. Painted wheels can handle soft microfiber towels or natural bristle brushes, while chrome or polished aluminum may require more delicate care. Avoid aggressive scrubbing on delicate finishes, and always test cleaning products in an inconspicuous area first.
Step 4: Paint Washing Technique
The heart of any professional hand wash car wash lies in proper paint cleaning technique. This step requires patience, the right materials, and systematic execution to achieve showroom-quality results without inflicting damage.
Start with your wash mitt properly prepared—soak it thoroughly in the soap bucket and ensure it’s completely saturated. Work in straight lines rather than circles, which can create visible swirl marks. The straight-line technique ensures that any minor scratches created during washing are uniform and easily corrected during polishing.
Divide your car into sections and complete one area at a time. Start with the cleanest areas (usually the roof and upper panels) and work toward the dirtiest sections (lower rockers and rear bumper). This prevents cross-contamination and ensures that heavily soiled areas don’t compromise the cleaner sections.
Use the two-bucket method religiously—after washing each panel section, rinse your mitt thoroughly in the rinse bucket before reloading with fresh soap solution. This simple step prevents dirt from being transferred between panels and is the single most important technique for preventing paint damage during washing.
Key Washing Techniques:
- Overlap your passes by 50% to ensure complete coverage
- Use minimal pressure—let the lubrication do the work
- Work in 2×2 foot sections for manageable coverage
- Rinse frequently to prevent soap from drying on the surface
- Maintain proper mitt saturation throughout the process
Advanced Hand Car Wash Techniques for Superior Results
Once you’ve mastered basic hand wash car wash fundamentals, advanced techniques can elevate your results to professional levels. These methods, used by experienced detailers, address specific challenges and deliver exceptional outcomes.
Suggested read: The Ultimate Guide to Suds Car Wash: Transform Your Vehicle Into a Sparkling Masterpiece
Clay Bar Treatment for Deep Cleaning
Clay bar decontamination represents the bridge between washing and polishing in professional car care. Even after thorough washing, microscopic contaminants remain bonded to your paint surface. These invisible particles create a rough texture that prevents waxes and sealants from adhering properly.
Professional clay bars are specially formulated compounds that safely remove embedded contaminants without damaging paint. When used with proper lubrication (usually a quick-detail spray or soap solution), clay bars glide across the surface, picking up bonded particles that washing alone cannot remove.
The clay bar process is methodical and requires patience. Work in small 2×2 foot sections, keeping the clay and surface well-lubricated. Gently glide the clay across the paint using straight, overlapping motions. You’ll feel the clay pick up contaminants—when it begins to grab or stick, fold and reshape the clay to expose a clean surface.
Multi-Stage Drying for Spot-Free Results
Proper drying technique is often overlooked but crucial for achieving professional hand wash car wash results. Water spots form when mineral-laden water evaporates, leaving behind calcium and magnesium deposits that etch into paint if left untreated.
The two-towel method provides superior drying results. Use a damp microfiber towel for initial water removal, followed by a dry towel for final drying. The damp towel prevents the dry towel from dragging across the paint, while the combination removes more water than either towel alone.
Synthetic chamois and waffle-weave towels offer excellent water absorption and paint safety. Avoid traditional leather chamois, which can become stiff and potentially scratch paint when not properly maintained. Modern synthetic alternatives provide superior performance with easier care requirements.
Seasonal Considerations for Hand Wash Car Wash Maintenance
Seasonal variations significantly impact your car washing routine, requiring adjustments to products, techniques, and frequency. Understanding these changes helps maintain optimal results year-round while protecting your investment in all weather conditions.
Winter Hand Washing Strategies
Cold weather car washing presents unique challenges that require special preparation and modified techniques. Road salt, used for ice management, is highly corrosive and demands frequent removal to prevent long-term damage to paint, metal components, and undercarriage elements.
Heated garage washing provides the ideal winter environment, allowing you to maintain regular washing schedules regardless of outdoor temperatures. If garage washing isn’t possible, choose the warmest part of the day and work quickly to prevent freezing. Consider waterless washing products for maintenance between full washes during extreme cold periods.
Undercarriage attention becomes critical during winter months. Road salt accumulates in hidden areas and continues its corrosive work long after visible salt disappears. Regular undercarriage rinsing, ideally weekly during heavy salt use periods, prevents costly corrosion damage that can affect structural integrity and resale value.
Summer Washing Optimization
Hot weather washing requires timing and technique adjustments to prevent product failure and achieve optimal results. Direct sunlight and high temperatures cause soaps and treatments to dry prematurely, leaving residues that are difficult to remove and may damage paint finishes.
Early morning or evening washing provides ideal conditions during summer months. Cool paint surfaces allow proper product dwell times, while reduced evaporation rates prevent premature drying. Working in shade, whether natural or artificial, further improves working conditions and results quality.
Increased washing frequency may be necessary during summer months due to higher activity levels, increased UV exposure, and contamination from insects, tree sap, and bird droppings. These organic contaminants become increasingly difficult to remove as they cure under intense heat and sunlight.
Suggested read: Light Wash Denim: The Ultimate Style Guide for Timeless Fashion
Troubleshooting Common Hand Wash Car Wash Problems
Even experienced enthusiasts encounter challenges during hand car washing. Understanding common problems and their solutions prevents frustration and ensures consistent, professional-quality results.
Water Spot Prevention and Removal
Water spots represent one of the most common complaints about car washing, but they’re entirely preventable with proper technique. These mineral deposits form when water evaporates faster than it can be dried, leaving behind dissolved minerals that etch into paint surfaces.
Prevention strategies include working in shade, maintaining wet surfaces during washing, and immediate drying after rinsing. Use distilled or filtered water for final rinsing in areas with hard water to eliminate mineral content entirely. This investment pays dividends in reduced spot formation and easier maintenance.
Existing water spot removal requires different approaches depending on severity. Fresh spots often respond to simple re-washing and proper drying. Older, etched spots may require mild abrasive treatments like polishing compounds or clay bar treatment. Severe etching might necessitate professional correction or wet sanding followed by polishing.
Dealing with Stubborn Contaminants
Tar, sap, and bug residue present special challenges that require targeted solutions beyond standard hand wash car wash procedures. These substances bond chemically with paint surfaces and resist removal through normal washing alone.
Specialized removal products target specific contaminants without damaging surrounding paint. Tar removers use solvents to dissolve petroleum-based deposits, while citrus-based products effectively tackle organic matter like sap and bug residue. Always test products in inconspicuous areas before full application.
Removal technique matters as much as product selection. Allow products adequate dwell time to penetrate and soften contaminants before attempting removal. Use plastic razor blades or specialized tools rather than aggressive scrubbing, which can damage paint while attempting contaminant removal.
Cost Analysis: Hand Wash Car Wash vs Professional Services
Understanding the financial benefits of hand washing helps justify the time investment and demonstrates long-term value compared to professional services or automated alternatives.
Initial Investment Breakdown
| Category | Quality Level | Price Range | Lifespan |
|---|---|---|---|
| Basic Supplies | Entry Level | $50-100 | 1-2 years |
| Professional Kit | Mid-Tier | $150-300 | 3-5 years |
| Premium Setup | High-End | $300-500 | 5+ years |
Quality tools and products represent a significant upfront investment but provide superior results and longevity compared to budget alternatives. Professional-grade wash mitts, for example, last years with proper care while maintaining their effectiveness, whereas cheap alternatives deteriorate quickly and may damage paint.
Long-Term Savings Comparison
Professional detailing services typically charge $100-300 for comprehensive washing and basic protection services. At monthly intervals, annual costs range from $1,200-3,600, not including additional services like paint correction or ceramic coating application.
Hand washing costs after initial equipment investment primarily involve consumables like soap, wax, and replacement towels. Annual consumable costs typically range from $100-200, representing massive savings compared to professional services while providing superior control over results quality.
Environmental Impact and Eco-Friendly Hand Washing
Environmentally conscious car washing has become increasingly important as water restrictions and environmental awareness grow. Hand wash car wash methods can be significantly more eco-friendly than commercial alternatives when proper techniques and products are employed.
Water Conservation Strategies
Traditional car washing can consume 80-140 gallons of water per session, but efficient hand washing techniques reduce consumption to 15-25 gallons while achieving superior results. The key lies in strategic water use and minimizing waste through proper planning and execution.
Suggested read: How to Find the Best Car Wash Coupons and Save Big on Every Wash
Spray nozzle control represents the simplest water conservation method. Use spray settings appropriate for each task—wide patterns for initial rinsing, focused streams for stubborn dirt, and shut-off capabilities between tasks. This simple practice can reduce water consumption by 30-50% without compromising cleaning effectiveness.
Waterless and rinseless washing products provide alternatives for water-restricted areas or environmentally conscious enthusiasts. These specially formulated products encapsulate dirt particles, allowing safe removal without traditional rinsing. While not suitable for heavily soiled vehicles, they provide excellent maintenance washing capabilities.
Biodegradable Product Selection
Eco-friendly car wash soaps use plant-based surfactants and biodegradable ingredients that break down naturally without harming local ecosystems. These products often perform equally well as traditional formulations while reducing environmental impact through responsible ingredient selection.
Phosphate-free formulations prevent nutrient pollution in waterways, which can cause algae blooms and ecosystem disruption. Many modern car care products eliminate phosphates without sacrificing cleaning performance, making environmental responsibility accessible to all enthusiasts.
Advanced Paint Protection After Hand Washing
Protecting your investment extends beyond regular washing to include paint protection systems that maintain your car’s appearance and value over time. Understanding these options helps maximize the benefits of your hand wash car wash routine.
Wax vs Sealant vs Ceramic Coating
Traditional carnauba wax provides warm depth and gloss that many enthusiasts prefer, but requires frequent reapplication (every 2-3 months) for optimal protection. Natural waxes excel in show car applications where appearance takes precedence over longevity.
Paint sealants offer synthetic protection lasting 6-12 months with proper application and maintenance. These products provide consistent protection levels and easier application than traditional waxes, making them ideal for daily drivers requiring reliable, long-term protection.
Ceramic coatings represent the premium protection category, offering 2-5 year durability with proper installation and maintenance. While requiring significant initial investment and professional application in many cases, ceramic coatings provide unparalleled protection and dramatically reduce maintenance requirements.
Application Techniques for Maximum Protection
Surface preparation determines protection product success more than any other factor. Even the highest-quality ceramic coating will fail if applied over contaminated or improperly prepared paint. This emphasizes the importance of thorough hand wash car wash procedures followed by clay bar treatment and paint correction as needed.
Environmental conditions during application significantly impact results. Apply protection products in shade with temperatures between 60-80°F and moderate humidity levels. Avoid application during temperature extremes or high humidity, which can cause curing problems and reduced effectiveness.
Professional Tips for Maintaining Your Hand Wash Routine
Consistency in car care produces cumulative benefits that become apparent over months and years of proper maintenance. Developing sustainable routines ensures long-term success without becoming overwhelming or burdensome.
Creating a Maintenance Schedule
Washing frequency depends on multiple factors including driving conditions, storage environment, and personal preferences. Daily drivers in harsh conditions may require weekly washing, while garage-stored weekend cars might need attention only monthly.
Seasonal adjustments help optimize your schedule for changing conditions. Winter may require more frequent washing due to salt exposure, while summer brings increased contamination from insects, tree sap, and UV damage requiring different attention levels.
Tool Maintenance and Storage
Proper tool care extends equipment life and maintains performance levels over time. Wash mitts and towels require thorough cleaning after each use, while buckets and brushes need regular sanitization to prevent bacterial growth and odor development.
Suggested read: Milk and Honey Body Wash: The Ultimate Luxury Skincare Experience
Storage considerations protect your investment in quality tools. Microfiber towels should be stored clean and dry to prevent mildew, while wash mitts benefit from thorough drying and proper ventilation. Chemical products require temperature-stable storage away from direct sunlight and freezing conditions.
Conclusion: Mastering the Art of Hand Wash Car Wash
Hand washing your car represents more than just cleaning—it’s an investment in your vehicle’s longevity, appearance, and value retention. The techniques, products, and methods outlined in this comprehensive guide provide the foundation for achieving professional-quality results at home while developing skills that will serve you throughout your car ownership experience.
The journey from casual car washer to skilled detailing enthusiast requires patience, practice, and continuous learning. Start with basic techniques and quality tools, then gradually incorporate advanced methods as your skills and confidence develop. Remember that consistent hand car wash maintenance produces better results than occasional intensive sessions, both for your car’s condition and your skill development.
Proper hand wash car wash techniques protect your investment while providing personal satisfaction that automated alternatives simply cannot match. The control, precision, and care possible through hand washing ensure that your vehicle receives exactly the attention it deserves, resulting in a finish that reflects your dedication to automotive excellence.
As you implement these techniques, remember that every car and situation presents unique challenges. Adapt methods to suit your specific needs while maintaining the fundamental principles of paint safety, thorough cleaning, and proper protection. With time and practice, your hand washing skills will develop to the point where professional-quality results become routine rather than exceptional.
Ready to take your car care to the next level? Start with quality tools and proven techniques, then gradually expand your skills as you discover the satisfaction that comes from maintaining your vehicle to the highest standards. Your car—and your wallet—will thank you for making the commitment to proper hand washing techniques.