In this guide
How to Replace a Generac Pressure Washer Pump: A Practical, Evidence-Based Guide
If your Generac pressure washer has lost its punch, you might be tempted to order a new pump right away. But pump replacement is not always the first step. The evidence reviewed here shows that a clear sequence of checks should come before you buy anything, and that replacing the pump is really only one possible solution. This article walks you through that sequence, explains when a replacement is worth it, and gives you a step-by-step approach based on published instructions and real-world demonstrations.
Important note: This article is informational only. It does not contain affiliate links or product recommendations. Always consult your Generac model’s official manual before starting any repair.
Diagnose Before You Replace
The most common mistake in pressure washer repair is jumping straight to parts replacement. A guide on Generac pump replacements puts it plainly:
> “Before replacing the pump, work through this order — GFCI and power → water supply → hose and nozzle → pressure release → unloader valve → pump” [1].
That means the pump is the last thing to suspect, not the first. Let’s break down each step.
GFCI and Power
A pressure washer that trips the GFCI or doesn’t turn on at all will obviously not build pressure. Check the power source, the cord, and the GFCI outlet before you ever open the pump housing. This seems basic, but it causes many unnecessary replacements.
Water Supply
Your water supply must be flowing normally. A kinked garden hose, a closed spigot, or a clogged inlet can all mimic a failed pump. Many people forget that a pressure washer needs a steady and clean supply of water on the inlet side.
Hose and Nozzle
Loss of pressure is often caused by things downstream of the pump. In one diagnostic video, the host notes that when pumps fail, you usually see:
> “a loss of pressure or inconsistent pressure” [5].
But he also points out that a blocked nozzle or a worn spray tip can produce the same symptoms. Before you blame the pump, inspect your high-pressure hose and nozzle for blockages, kinks, or damage.
Pressure Release
Before doing any work, you need to release pressure from the system. This is both a safety step and a diagnostic one. A stuck pressure-release valve or an unloader valve that is not functioning correctly can make the pump look bad when the issue is actually in the valve.
Unloader Valve
The unloader valve is a small but critical component that regulates pressure inside the pump. If it fails, the pump can build too much pressure or not enough. It is often mistaken for a dead pump. The diagnostic order in [1] places the unloader valve before the pump for this reason.
Pump
Only after all of the above checks fail should you consider the pump itself. However, even then, there is one more thing to look at: the inlet filter.
Check the Inlet Filter Before Buying a Pump
A diagnostic video that covers pressure washer pump failure shows a rusty inlet screen on the low-pressure side:
> “on the low pressure side here where the water actually comes in there’s a filter and as you can see with mine it’s pretty Rusty there’s actually a little hole it’s in pretty bad shape so this also can restrict water flow and prevent the pump from working the way it should” [5].
That inlet filter is supposed to keep debris from entering the pump. If it is rusted or clogged, it can restrict water flow and make the pump appear weak or dead. It is a much cheaper fix than replacing the whole pump. If you are not sure whether this is the issue, pull the inlet housing and inspect the screen before ordering a new pump.
Understanding Pump Service Life and Whether a Replacement Is Worth It
Pumps do not last forever. The same video source gives some rough service-life guidelines:
> “horizontal pumps with the shaft coming out are supposed to be between two and 400 hours service lifetime, a vertical pump … those are supposed to only be like 100 hours maybe 100 to 200 hours” [5].
In plain terms, horizontal pumps tend to last longer than vertical pumps. If your pump is within these ranges and still failing, replacement may make financial sense. If your pump is far below the expected service life, an internal repair or maintenance check might be the better route.
The same source makes an important cost-benefit point:
> “when you look at the pressure washer as a whole you know you’re talking about a $34–500 prosumer pressure washer that I’ve got right here and so by putting another $150 into it you have to decide you just want to replace the whole thing, especially if you start to have motor issues” [5].
So replacing a pump can be a reasonable repair for a higher-end machine, but it is not always a good idea if the engine is also failing. Before you spend money on a pump, confirm that the engine and other major components are sound.
Step-by-Step Pump Replacement: What the Evidence Shows
Replacing a pressure washer pump is often described as a simple job. In theory, it is. But the real world raises some practical problems.
Suggested read: Buying Generac Pressure Washer Parts Online: A Practical Guide for U.S. Shoppers
Before You Begin: Safety and Manuals
The first steps are not optional. According to one how-to guide:
> “Disconnect the spark plug wire on your pressure washer. · 2. Set the washer in a secure location. · 3. Remove the bolts attaching the pump to …” [2].
Disconnecting the spark plug wire prevents the engine from accidentally starting. Setting the washer in a secure, flat location makes the job easier and safer. A video demonstration of a Generac pump replacement also stresses:
> “Before you start, ensure to read the installation manual” [3].
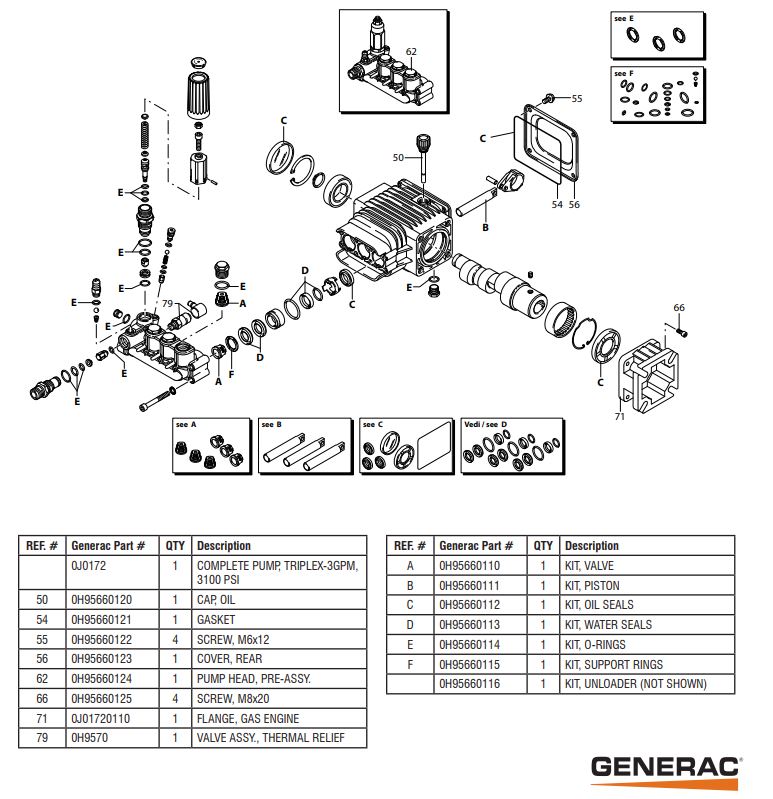
That manual might be a Generac service manual, like the one that covers Generac models 97492 and 95523, which explicitly includes a section on the pressure washer pump [6]. If you own one of these models, that manual can give you model-specific details. If not, look for a manual that matches your exact model number.
Removing the Old Pump
The pump usually attaches with a small number of bolts. In one real-world example, the host says:
> “in theory this is pretty easy to change because it’s only four bolts” [5].
But he also warns:
> “because of the years of heat and cold and heat and cold and on and off not only May these bolts give us some trouble but actually sliding this off the shaft could be problematic too” [5].
This is an important practical limitation. Bolts can seize, and the pump can become stuck to the shaft. To make it easier, the same source recommends:
> “let’s start with some penetrating spray on each of these make sure we get that we’re going to let that sit for a few minutes” [5].
After letting the penetrating spray work, remove the bolts attaching the pump [2]. Then you will need to slide the pump off the crankshaft. In the video, this required prying [5]. If your pump will not slide, one expert Q&A advises caution:
> “If the pump won’t slide off the crankshaft, avoid …” [4].
The exact wording is cut off, but the meaning is clear: do not force it. Forcing a stuck pump can damage the crankshaft or the new pump. If you cannot get it off without unusual force, stop and consult a professional or a model-specific service manual.
Installing the New Pump
When you buy a replacement pump, you may not need to buy separate hardware. In the video example:
> “the new pump comes with new bolts like the ones I just took off it comes with a new inlet hose” [5].
That means you should check the kit before you start. If your pump kit includes new bolts and a new inlet hose, use them. They are there to ensure a clean, reliable connection.
During installation, you will need to reverse the removal process. But because the evidence sources do not show a specific torque specification or a detailed model-by-model reassembly sequence, treat your included installation manual as the final authority [3]. The mechanics of the pump are independent of the engine’s carburetor and oil system, as one source explains:
> “the mechanics of the piston and the carburetor the oil all of those parts are independent so you don’t have to worry about any water Integrity on this side it’s only in the pump itself” [5].
That is reassuring: replacing the pump does not require opening up the engine. It is a self-contained water component.
After the Replacement
The evidence does not provide a detailed post-install test procedure, so you should follow the written instructions that come with your pump or manual. In general, you will need to reconnect the water supply, clear any air from the system, and test the unit at low pressure. If anything seems off, stop and review the manual before continuing.
Practical Limitations and When to Call a Pro
The biggest practical limitation is mechanical resistance. As the video source puts it:
> “in theory this is pretty easy to change because it’s only four bolts, but because of the years of heat and cold … those bolts may give us some trouble” [5].
If you are not comfortable working with spark plugs, bolts that may be seized, or a pump that is stuck on a shaft, it is reasonable to hire a small-engine technician. A professional will have the right tools and experience to avoid damaging the crankshaft.
Another limitation is the condition of the rest of the machine. The same source makes a balanced recommendation:
> “by putting another $150 into it you have to decide you just want to replace the whole thing especially if you start to have motor issues or something like that” [5].
So if your Generac engine is already running poorly, a new pump may be money spent on a machine that will soon need more. In that case, a replacement may not be worth it.
A Balanced Recommendation: Not Every Pump Needs Replacing
If you are experiencing pressure loss, start with the diagnostic order [1]. Check the inlet filter [5], and if you have not maintained the pump oil, do that first. One expert Q&A recommends:
> “drain and replace pump oil regularly with recommended synthetic oil” [4].
Suggested read: Best Generac Pressure Washer Replacement Parts: A Commercial Investigation
Many pump issues are caused by degraded oil, sediment, or a clogged filter rather than a dead pump. If your pump is still within its expected service life, an internal service may fix it without a full replacement [5]. But if the pump is at the end of its life, the machine is otherwise healthy, and you are comfortable with the procedure, replacing the pump is a legitimate repair.
Model-Specific Help and Manuals
Generac makes many different pressure washer models. The right repair depends on the exact model. One example found in the evidence is a Generac service manual covering models 97492 and 95523, which explicitly includes the pressure washer pump section [6]. These manuals are sometimes available through third-party listings, so it is worth searching for a manual that matches your model before you begin. Even if you have watched videos, a written manual gives you correct torque values, part numbers, and safety notes.
—
Sources
1. Replacement Pump for Generac Pressure Washer: Diagnose First
2. [How to Replace Your Pressure Washer Pump [Remove + Install]](https://theropshop.com/rugged-u/blog/how-to-remove-and-install-your-pressure-washer-pump)
3. Pressure Washer Pump Replacement (Vevor pump on Generac machine) – YouTube
4. Generac Pressure Washer 3000 PSI Q&A – JustAnswer
5. How To Diagnose and Replace a Pressure Washer Water Pump – YouTube
6. Generac 97492 95523 Service Manual – Pressure Washers